
Measuring
Step 1.
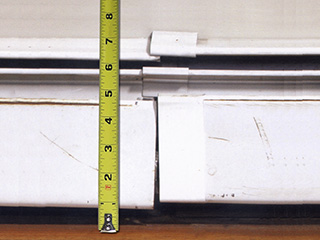
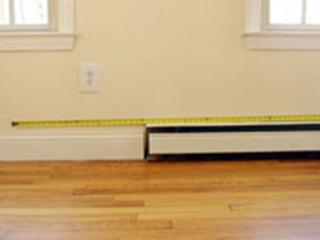
Measure the height of your existing baseboard radiator. OverBoards are compatible with any baseboard radiator up to 8.25” high, with the front of the fin-tube heating element up to 3” from the wall. Overboards are also compatible with electric baseboards that meet these dimensional requirements. Call us at 1-800-835-0121 if your baseboards don’t meet these requirements, and we may have a solution.
Step 2.
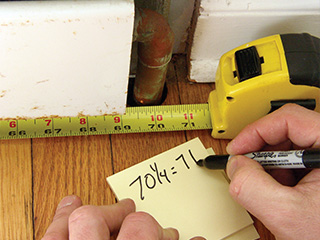
Remove the end caps from your existing baseboard radiators, to reveal the copper tubing at the radiator entrance and exit. Measure from the outside edge of the copper pipe (or sheet metal enclosure, whichever is longer) at the left side, to the outside edge of the copper pipe or sheet metal enclosure at the right side. If your pipes don’t drop down through the floor, but extend through the wall into the next room, measure to the wall.
NOTE: Right and Left refer to your right and left as you look at the radiator.
Step 3.
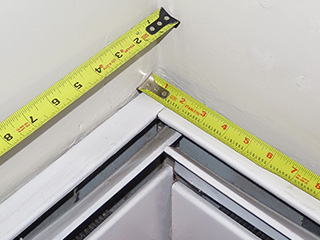
If your old radiator extends around a corner to a perpendicular wall, take two measurements. First, measure from the left side of the radiator to the corner, and then from the right side of the radiator to the same corner.
Step 4.
If the end of the baseboard radiator runs to the perpendicular wall, please note whether this applies to the right, left, or both sides of the radiator. The OverBoards Wall-to-Wall End Caps are designed for this application.
Step 5.
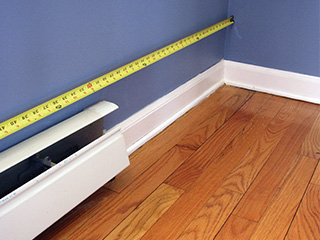
Next, measure the entire length of the free wall space, corner to corner. If there are obstructions, such as door casing or stairs, please note their distance from the heater. This is the maximum length of OverBoards that may be used on this wall.
Step 6.
Sometimes your existing radiators appear “off-center” in the room. You may want to measure the length needed to visually center the radiator on the wall. You can always order a longer length of OverBoards to achieve a more balanced appearance.
.
Tools Required:
– 3/16 x 6” drill bit
– 6” Phillips head driver bit
– 3/32 Allen wrench
– Drill/Driver (for use with provided 6” drill and driver bits
Step 1.
From the old baseboard radiator, remove: 1. Both end caps and any inside corner covers 2.the front panel and 3. the vent louver. These components should pull off fairly easily, and may be discarded. The sheet metal backing behind the heating element of the old baseboard radiator is generally attached to the wall, and may be left in place.
Step 2.
Carefully remove any baseboard molding from the wall. Before removing the molding, it’s a good idea to use a razor blade to break any seal created by paint or caulk between the molding and the wall. This molding will be re-sized and re-installed as the final project step.
Step 3.
Line up the OverBoards components in sequence, placing them face down on a smooth, flat surface. Refer to the Assembly Maps included in your order to determine which components are needed for each room.
Step 4.
Begin with the components spaced about 2” apart, so that the 2” alignment plates can slide into the slots. Using the provided Allen wrench, thread the set screws into the alignment plates prior to sliding the plates into the slots.
Step 5.
The length of the alignment plate should equally span the seam between the mating parts, 1” on each side.
Step 6.
Start at the upper slot. Press the mating parts together to make sure the seam is tight (an assistant is helpful with this), and place downward pressure on the mating parts to insure proper alignment at the front face. Tighten the set screws. Do the same for the lower slot.
Step 7.
Raise the OverBoards assembly upright, and position over the heating element and the sheet metal behind the element. Center the OverBoards assembly on the wall, if desired.
Step 8.
After confirming correct placement, locate the wall studs behind the radiator. Mark these with a pencil at a spot a bit higher than the OverBoards.
Step 9.
Using a 6” boring drill bit, pre-drill holes through the recessed slot in the OverBoards mounting plate at the stud locations. Switch to the 6” driver bit, and drive the 1” mounting screws through the mounting plate and into the wall studs. The mounting plate is accessed through the front vents of the OverBoards.
Step 10.
If re-installing baseboard molding, note that the Traditional and Shaker OverBoards End Caps are designed to allow the molding to slide behind the foot detail. This will allow you to make simple straight cuts to butt the molding against the End Caps. Measure, cut, and re-install the baseboard molding. . If using the NEW Designer End Cap, these end caps do not allow the molding to fit behind a foot detail, but coping the molding will allow for a clean fit to the end cap. As a final step, we highly recommend an application of white acrylic caulk to minimize the appearance of the seams between the Main Panels and the End Caps.